How to Boot from USB Key - A Step-by-Step Guide
- Understanding USB Booting
- Step-by-Step Guide to Boot from USB
- Troubleshooting Common USB Boot Issues
- Using Ninja Stik for USB Booting
Understanding USB Booting
Booting from a USB key is an incredibly useful process for installing operating systems, recovering data, or running diagnostic tools. It allows you to use a portable device to boot up your computer or laptop without relying on its internal hard drive. This process is often faster, and in some cases, it’s essential if your computer’s operating system becomes corrupted.
Before we dive into the actual steps, it’s important to understand the basics of USB booting. A USB boot key is essentially a flash drive that contains a bootable operating system or tool. It is recognized by your computer’s BIOS (Basic Input/Output System) or UEFI (Unified Extensible Firmware Interface), which are the software responsible for initializing hardware and starting your computer’s operating system. Once configured properly, your computer can boot directly from the USB key instead of the internal hard drive.
Step-by-Step Guide to Boot from USB
Now that we understand what USB booting is, let’s walk through the actual process of booting from a USB key. Follow these simple steps:
- Prepare the USB Key: First, ensure your USB key is correctly formatted and contains a bootable image. You can create a bootable USB drive using tools like Rufus or UNetbootin. Make sure the OS or tool image is correctly loaded onto the USB.
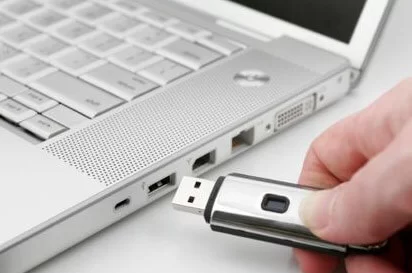
- Insert the USB Key into Your Computer: Plug the USB drive into an available USB port on your computer. Ensure the USB key is securely connected.
- Access the BIOS or UEFI Settings: Restart your computer and immediately press the appropriate key (usually F2, F12, ESC, or DEL) to enter the BIOS or UEFI settings. This varies depending on the manufacturer of your computer.
- Change the Boot Order: Once in the BIOS/UEFI menu, navigate to the boot settings. Here, change the boot order to prioritize the USB device. Save and exit the BIOS/UEFI settings.
- Boot from USB: Restart your computer, and it should boot from the USB key. Follow the on-screen prompts to complete the process, whether it’s installing an OS or running a diagnostic tool.
If you follow these steps correctly, your computer should boot from the USB key without any issues. However, if you encounter problems, read on to see how to troubleshoot common USB boot issues.
Troubleshooting Common USB Boot Issues
Despite being a straightforward process, there are several common issues users face when trying to boot from a USB key. Here are a few solutions to help you troubleshoot:
- USB Drive Not Detected: If your USB key isn’t showing up in the boot options, make sure it’s properly formatted and contains a bootable image. You may also need to enable “Legacy Boot” or “USB Boot” in the BIOS/UEFI settings.
- Wrong Boot Order: Double-check the boot order in the BIOS/UEFI. Ensure the USB device is set to boot first, above the hard drive.
- Corrupted USB Image: If the bootable USB drive is corrupted, it won’t work. Try reformatting the drive and creating a new bootable image.
Using Ninja Stik for USB Booting
If you’re looking for an even easier solution to boot from USB, the Ninja Stik is a powerful tool to consider. It simplifies the process of booting from USB by providing a compact, reliable, and efficient USB boot device. With Ninja Stik, you can quickly load different operating systems, repair tools, or other utilities without the need for complicated setup procedures.
Visit Ninja Stik to learn more about how this tool can help you easily boot from USB and improve your computer’s performance. Whether you’re a tech enthusiast or just someone looking for an efficient booting solution, Ninja Stik makes USB booting simpler than ever.

