Dell Computer Boot Menu Navigation – A Complete Guide to Boot Settings and Options
- Why Dell Boot Menu Navigation is Important
- How to Access the Dell Boot Menu
- Dell Boot Menu Options and Settings
- Troubleshooting Dell Boot Menu Issues
- How to Use Dell Boot Menu for Installation
1. Why Dell Boot Menu Navigation is Important
Understanding how to navigate the boot menu on a Dell computer is essential for a variety of tasks. Whether you’re troubleshooting issues, reinstalling your operating system, or booting from an external device, accessing and using the boot menu correctly can save you time and frustration.
By knowing the boot menu options, you can quickly select the right device or recovery tool, bypass certain startup issues, or even install a fresh version of your operating system from a USB drive or DVD. This knowledge is invaluable, especially for those who perform regular system maintenance or need to recover a device after it fails to boot normally.
2. How to Access the Dell Boot Menu
To access the boot menu on a Dell laptop or desktop, follow these simple steps:
- Power off your Dell computer: If it’s on, shut it down completely.
- Turn on the computer: Press the power button to turn the system back on.
- Press the F12 key: As soon as the Dell logo appears, press the F12 key repeatedly. This will bring up the boot menu.
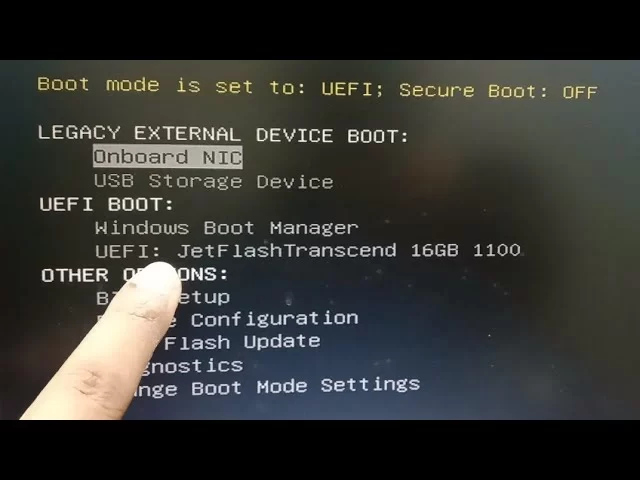
- Select your boot device: Once the boot menu appears, you’ll see a list of available devices (e.g., hard drive, USB drive, network boot). Use the arrow keys to select the desired boot device and press Enter.
It's crucial to press the F12 key before the Windows logo appears. If you miss the timing, you can simply restart the computer and try again.
3. Dell Boot Menu Options and Settings
The Dell boot menu offers several options depending on your system configuration and attached devices. Here are the main options you’ll encounter:
- Internal Hard Drive: This is the default option and is where your operating system typically resides. If you want to boot into Windows or another installed OS, select this option.
- USB Storage Device: This option allows you to boot from a USB drive, such as a bootable USB with a Windows installation tool or a recovery disk. It’s essential for tasks like reinstalling an OS or running diagnostics.
- CD/DVD/CD-RW Drive: If you’re using a bootable disc for installation or recovery, select this option. Your system will attempt to boot from the optical drive.
- Diagnostics: You can select this option to run Dell's built-in diagnostic tests to check for hardware issues, which can help you troubleshoot problems before your operating system loads.
- Network Boot (PXE Boot): This option is used for booting from a network server, typically used in enterprise environments or by advanced users who need to run systems over a network.
4. Troubleshooting Dell Boot Menu Issues
If you're having trouble accessing the Dell boot menu or booting from a device, here are some common issues and troubleshooting steps:
- Boot Menu Not Appearing: If pressing F12 doesn’t bring up the boot menu, ensure you’re pressing the key at the right moment, just after the Dell logo appears. Also, verify that your keyboard is working properly.
- Incorrect Boot Device Selected: Double-check that you’re selecting the correct device. If your USB or external device isn’t appearing, ensure it’s properly connected and is bootable.
- Device Not Booting: If your system isn’t booting from your selected device, it could be due to a corrupt bootable drive or improper setup. Try reformatting the drive or using a different USB port.
If you continue to experience issues, it may be helpful to update your BIOS settings or reset the BIOS to default settings. You can also contact Dell support for further assistance.
5. How to Use Dell Boot Menu for Installation
One of the most common uses of the Dell boot menu is installing or reinstalling an operating system. Here's how you can use the boot menu for this purpose:
- Prepare a Bootable USB Drive: Create a bootable USB drive with the Windows installation media or a recovery image using tools like the Windows Media Creation Tool.
- Insert the USB Drive: Plug the USB drive into one of the USB ports on your Dell laptop or desktop.
- Access the Boot Menu: Power on your Dell device and press F12 to access the boot menu. Select the USB device from the list.
- Follow Installation Instructions: Once the installation process begins, follow the on-screen instructions to set up Windows or another operating system. You’ll be prompted to choose your language, partition, and installation settings.
By using the Dell boot menu, you can easily install or repair your operating system. Be sure to back up important data before proceeding with any installation process, as it may erase the contents of your hard drive.
For more tips and information on managing your Dell computer, visit Ninja Stik for expert advice and resources.